 |
| |
 |
Step 1 - Options: Memory Card Drive, File Type and Destination Folder |
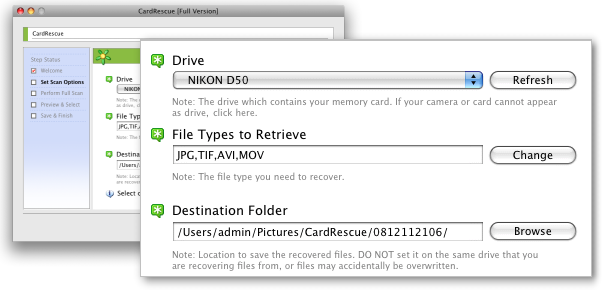 |
1. Drive:
Connect your camera or card reader to your Mac. If a drive appears on your Mac Desktop, the drive can be found from the Drive list -> Logical Drives. You may select the drive of your memory card. When you connect the camera or card reader after you launch the program, you may click [Refresh] button to refresh the Drive list.
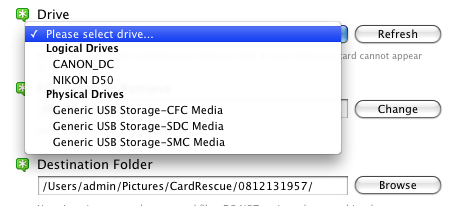
CardRescue shows both "Logical Drives" and "Physical Drives" in the system. In most cases, your drive will be listed in both "Logical Drives" and "Physical Drives" sections. You may select one of them (item in Logical Drive is recommended). For damaged memory card that cannot be mounted on Desktop, it may only be listed in "Physical Drives" section.
If your camera cannot appear in the Drive list, please click here.
2. File Types to Retrieve
The file types you need to recover from the memory card. You may click the [Change] button to change the file type selections. It is recommended to select only the file type you need to reduce the time of scan. After you click [Change] button, following Window will show:
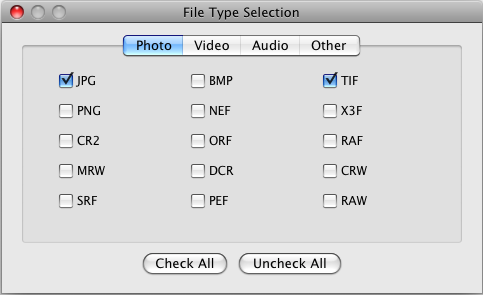
On the File Type Selection window, you may choose the File Type you need. Click [Check All] to select all the file types in current tab, and [Uncheck All] to deselect all the file types in current tab.
3. Destination Folder
The destination folder to save the recovered files. It uses a default folder in your "Home Folder/Pictures/CardRescue/". You may click [Browse] button to change it if you need.
NOTE: Attaching the camera or card reader may cause iPhoto or other camera utilities to automatically appear. You can safely ignore or quit these programs. |
|
| |
 |
Step 2 - Automatic Memory Card Scan and Photo Search |
| |
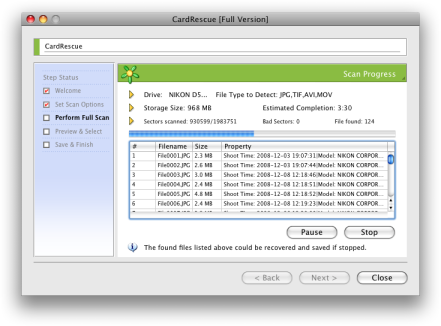 |
CardRescue will scan the drive you have selected on Step 1. It will list the picture and movie files it finds during scanning. Also, you may know the estimated completion time and sector number it scanned, and the number of found files from the interface. For the found files, it will list Filename, Size, and Image Property (it usually includes Shooting Time, Camera Modal and Image Size).
You do not need to do anything on Step 2, and CardRescue will perform the scan fully automatically. Usually, it takes 3 - 5 minutes for a 1 GB Compact Flash card, and about 20 minutes for a 8 GB Secure Digital card.
If you need, you may click [Pause] button to pause the scan and resume it later (do not quit the program). Or click [Stop] to terminate the scan process and rescue the found files it has listed. |
| |
 |
Step 3 - Recovered Pictures Preview and Selection |
| |
|
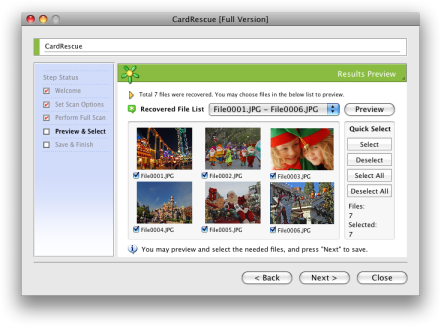 |
On step 3, CardRescue will list the found picture files and movie files. For JPEG picture files, you may preview them in thumbnails.
There are 4 buttons on the right panel. [Select] button will select all the 6 files that currently in preview. [Deselect] button will deselect all the 6 files that currently in preview. [Select All] button will select all the files, and [Deselect All] will deselect all the files.
By Default, all the found files were selected. So if you need all the found files, you do not need to use the [Select]/[Select All] or [Deselect]/[Deselect All] buttons.
If you just need some of those found picture files, you may click [Deselect All], then select the needed ones.
After you click [Next] button on Step 3, the files that you selected will be saved to destination folder (Note: the saving feature is disabled in the evaluation version, and it is only available in the full version) |
|
| |
 |
More Questions or Problems? |
| |
CardRescue is very easy to use and just 3 steps to complete the recovery. If you have any further questions or problems using the software, please feel free to contact us.
|
| |
|